June 1, 2013

Easy Cole Slaw Recipe


This is a really yummy recipe for a summer time staple - Cole Slaw.  Although, we eat it year round, I thought it would be a good summertime share!  Quick and easy to make, very few ingredients, and everyone LOVES it!  We love it paired with BBQ pulled pork sandwiches.....I'll have to share that recipe with you sometime as well.

So here's what you need:


A bag of pre cut cole slaw - love this stuff.  It makes this recipe very quick and easy.  Vinegar - I like the apple cider, mayo, sugar and black pepper.

Dump the cole slaw in a bowl and set aside


In a smaller bowl, add 2/3 Cup mayo


1/4 Cup sugar


2 Tblsp vinegar

 
stir until well blended and smooth
 

add black pepper to taste


stir to blend in again


now at this point, you can taste the sauce to determine if you need more vinegar or pepper.  This is the perfect blend for me, but adjust as needed to your taste!  Pour over cole slaw


Stir well to completely distribute the sauce.  It will seem a little dry at first, but the cabbage will start to reduce a little and it will be easier to stir and mix.  This is fabulous on BBQ sandwiches or just by itself as a side dish.  Enjoy!


As always, leave comments, questions or suggestions in the comments section below!

Thanks for stopping by!


Pin It!

May 31, 2013

Spring Bouquet Leaf Tutorial


Today I'm going to do a quick tutorial to show you how I altered a cut file from the Silhouette online store to make it work on my project. 

I started out with the cut file named Hero Arts solid leaf.


Then I clicked the "mirror image below" option.  Using the knife tool, I cut the mirror images apart from each other and moved the lower part down a bit.  Then using the line tool, I just drew straight lines to connect the two pieces together again.  I'm sorry I didn't get pics of these steps, but doing this tutorial was kind of an after thought!  I'll do another one next time I alter something.


After it was all cut, I just folded the leaves in half and wrapped them around the branches.  It was the only way I could figure out how to get them to stay on there!

So that's it, pretty simple with the Silhouette!

Please leave any comments, questions or suggestions in the comments section!

Thanks for stopping by!


Pin It!

May 30, 2013

Spring Bouquet with Silhouette


Hi all!  I hope everyone is enjoying their spring so far......it's just kind of blown right by, and now we're almost into Summer already!

I love decorating for the different seasons.  I like having different colors always revolving in my decor, so it's not always same ole, same ole.  Of course, making most of the decor in my house is always very fun and satisfying.

I'm going to show you how I made the Spring Bouquet using my Silhouette Cameo.  I seriously don't think I could go a day without this machine!  The possibilities for this machine is seriously endless.  You are bound only by your imagination!  They have cut files available for absolutely anything that you would ever need, and are constantly adding new ones.  Their artists are phenomenal! 

First I made a bunch of the flowers using the cut file named 3d peony at the Silhouette online store.  This is what it looks like all together:


Isn't it beautiful!  It's amazing that it's completely made from paper!

This is what all the pieces look like when you first cut them:


To achieve the "curled up" look on the petals, just take a rounded object like a pencil, or I used the end of my Silhouette weeding tool, gently pull out from the center using your thumb underneath to curl each petal upward.


I alternated starting at one side curling one direction, and then the other, and some of them straight out.  I think that gives it a more natural "not so perfect" look, and each flower will look different.  You'll get the hang of it after putting your first one together, as far as how much to curl on each piece to achieve the look you want.  Here are the larger pieces all curled:


When you start on the smaller pieces, they have skinnier petals, so you have to be careful while curling....I tore a few!  I found that if I held each petal just a little out from the center it was much easier.


Now just start layering, starting with the larger pieces and working your way to the center, twisting and rotating each layer until it looks just right.  I used a glue dot in the center of each of the layers to stick them together.


Now the center of the flower was my favorite to do!  It was so fun!  This is what it looks like after it's cut.  Just tiny little fringes.


Then start rolling, rolling, rolling......(now that song is stuck in my head!)


One of the larger glue dots fit perfect on the bottom - the bottom is the non fringed part.  Then the fun part!  Using your thumbs, from the outside layers just start pulling outward working your way in separating all the little fringes.  So cool!  (as you can see, I'm easily amused!)


and voila!


Now to make the leaves, I just cut several of just the larger layers of the flower petals in green and cut them apart.  I learned that trick from another tutorial on the Silhouette Bog!


I did the flowers in 3 different colors to complete my bouquet.


I went outside and gathered a bunch of small branches to attach my flowers to.  I loved the pretty look of the paper and the rustic look of the wood paired together.  I thought they looked fabulous in my owl pitcher that I purchased from Hobby Lobby.  I love that little guy!


I hope you liked the tutorial for the Spring Bouquet.  Tomorrow, I will show you how I made the leaves on the branches.  They are made from a cut file from the Silhouette online store also, but I had to alter it a little to make it work.  Silhouette makes it so easy to do that!

If you love the flower, but don't own a Silhouette, I will be happy to cut as many as you need!  You can go to my Etsy shop to purchase them.

Leave any thoughts, questions or suggestions in the comments section!

Thanks for stopping by! 


Pin It!

November 27, 2012

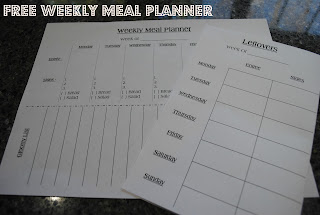
FREE Weekly Meal Planner


Hey everyone!

I've been desparately trying to get organized and ready myself for this new blog so I actually have time to post stuff on it!  One of the things I've been working on is trying to make better use of my days and make them more efficient.

Believe it or not, I have just started getting in the habit of doing grocery shopping just once a week.  I clip my coupons on Sunday and then Monday I make the meal plan for the whole week,  make my grocery list and do my grocery shopping.  It's actually pretty nice to not have to go grocery shopping so often, and it has really saved us some money too. 

I wanted to come up with a way to keep my meals for the week nice and organized.  I came up with this weekly meal planner that I wanted to share with you.  The top half is a nice place to write down your entrees and your side dishes for each day of the week and even if you need bread or salad to go with your meal.


The other half is a grocery list for you to record everything you need to make your meals that week.  The neat thing is, you can cut it right off your meal planner for an instant list to take to the store with you. 


I have used this for a couple of weeks now and I have to say, I really like it!  I really like having all our meals planned out for the week.  It saves a lot of time during the day not having to worry about what I'm fixing for supper and if I'm going to need anything from the store after I figure it out.  It leaves more time in the day for crafting! 

The second part of the planner that I decided to make is a list for leftovers.  Since I'm the one that cooks and puts away leftovers, I usually know what's in the refrigerator, so the list is really helpful for the other members of the family.  It keeps them from digging through the fridge to see what's in there!  But it is also helpful for me to plan more efficiently to use up any leftovers we may have for lunches, snacks or if there is enough left over, just add it to another meal that week.


I have mine on the side of my refrigerator for easy access.  You could also put it inside a cupboard door if you have a stainless steel fridge that you can't use magnets on.

I hope that you can use this and it helps you stay organized like it does for me!  If you would like a copy of either or both, just leave a comment with your email address and state if you would like it in Word, Publisher or PDF format.

I will be making tablets with a month's worth of Meal Planners and Leftover Lists that will be available for sale on my Etsy shop soon!

Thanks for stopping by!

Pin It!

Homemade Cranberry Sauce


I know what you're probably thinking....."Thanksgiving is over!"

Well, that may be true, but this recipe is soooo yummy and good all year round.  It's hard for me to eat ham or turkey without it anymore.  It's also good with pork chops and chicken.  Even if you think you don't like cranberry sauce, you have to give this one a try.  It's such an easy peasy recipe, you can make a big batch and keep it in the refrigerator for when you need it.  I've never tried to freeze it, but if anyone tries it, please let me know how it works out!

In a baking dish, combine 4 Cups fresh cranberries, 2 Cups sugar and 1/2 teaspoon cinnamon.  Give it a little stir.


Bake covered at 350 degrees for 45 minutes.


I forgot to cover mine, so a lot of my cranberries didn't burst......don't do that :o)

Next stir in a 13 oz jar of orange marmalade, 1 Cup coarsely chopped walnuts and 2 Tablespoons lemon juice.


That's it!  It's such a beautiful rich color!  You can serve it warm, cold or room temperature.

I always make extra and jar it to give to friends and neighbors for gifts a day or two before Thanksgiving - or the day of, if I'm unorganized like I was this year!


You have to make this right now!  Let me know how you like it!

Thanks so much for stopping by!


Pin It!